

This article describes how to install the Inventory Visibility Add-in for Microsoft Dynamics 365 Supply Chain Management and how to set up this feature to use soft reservation functionality.
In the beginning, I’d like to make a brief overview of its possibilities. The Inventory Visibility service provides an independent and highly scalable microservice that enables real-time on-hand inventory change postings and visibility tracking across all your data sources and channels. It provides a platform that lets you manage your global inventory by using functionality that includes (but isn't limited to) the following list:
- Centrally track the latest inventory status (such as on-hand, ordered, purchased, in-transit, returned, and quarantined) across all your data sources, warehouses, and locations by connecting your Supply Chain Management or third-party logistics data sources (such as order management systems, third-party enterprise resource planning systems, POS systems, and warehouse management systems) to the Inventory Visibility service.
- Query on-hand stock availability and shortages, and obtain immediate responses by calling the Inventory Visibility service directly.
- Better manage promised orders and customer expectations by providing accurate current or next-available dates so that the omnichannel available-to-promise (ATP) feature can calculate expected order fulfillment dates.
The Inventory visibility integration package is included with Supply Chain Management code since version 10.0.18. However, in the modern version 10.0.33 (service update is enabled from 14.04.2023) functionality was improved with a soft reservation feature which is aimed to ensure avoiding overselling, especially when your demand comes from different channels, by making real-time soft reservations in the Inventory Visibility service.
Let’s our overview of what we need to configure to start using the Inventory Visibility application with a soft reservation feature:
- The first step of the inventory visibility installation process will be to register an application and add a client secret to Azure Active Directory (Azure AD) under your Azure subscription. Follow these steps to create the app registration:
- Sign in to the Azure portal (https://portal.azure.com/#home)
- Search for and select Manage Azure Active Directory.
- Click [Add] -> App registration
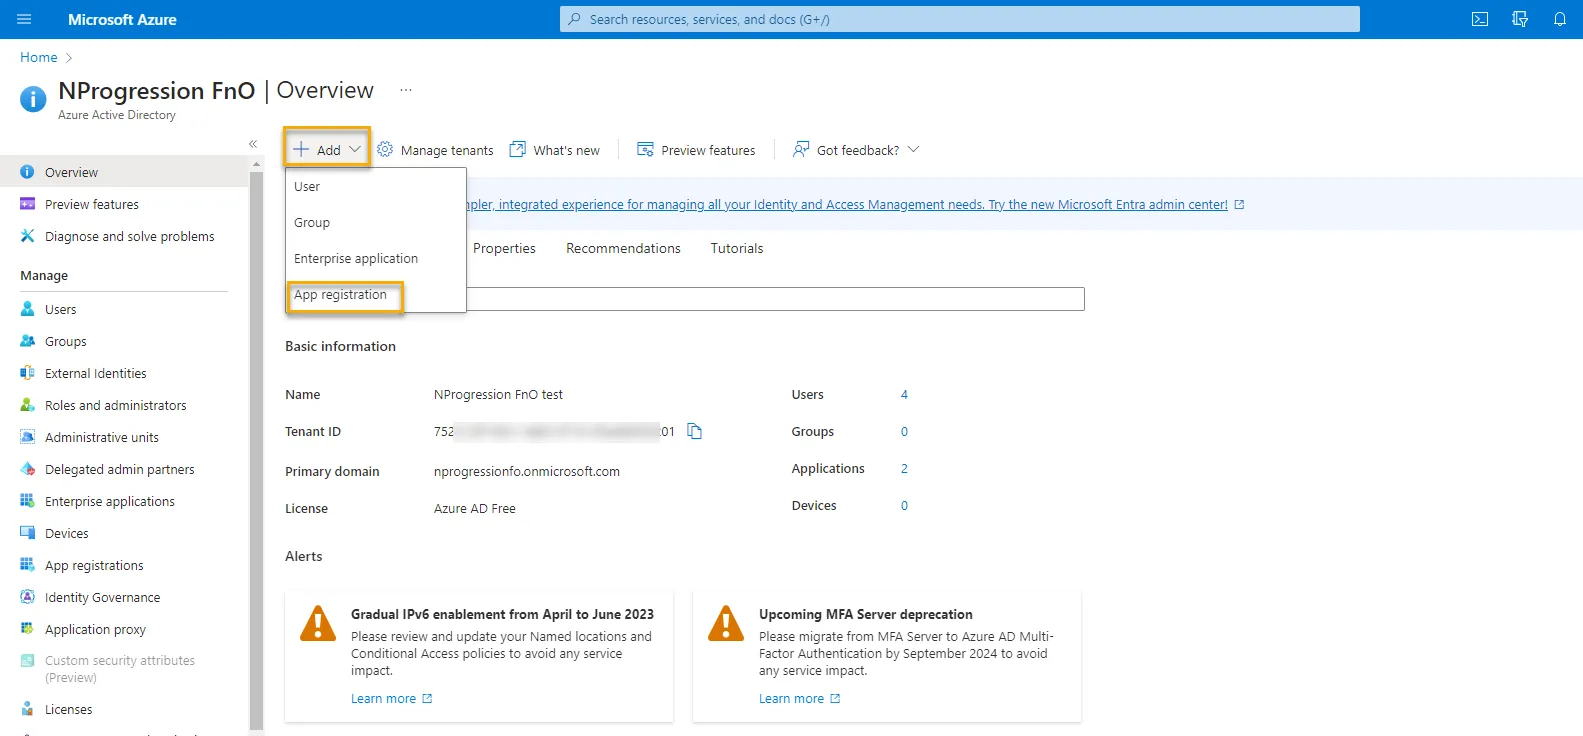
- Enter a display Name for your application. Users of your application might see the display name when they use the app, for example during sign-in. You can change the display name anytime, and multiple app registrations can share the same name.
- Specify who can use the application.
- Don't enter anything for Redirect URI (optional). You'll configure a redirect URI in the next section.
- Select Register to complete the initial app registration.

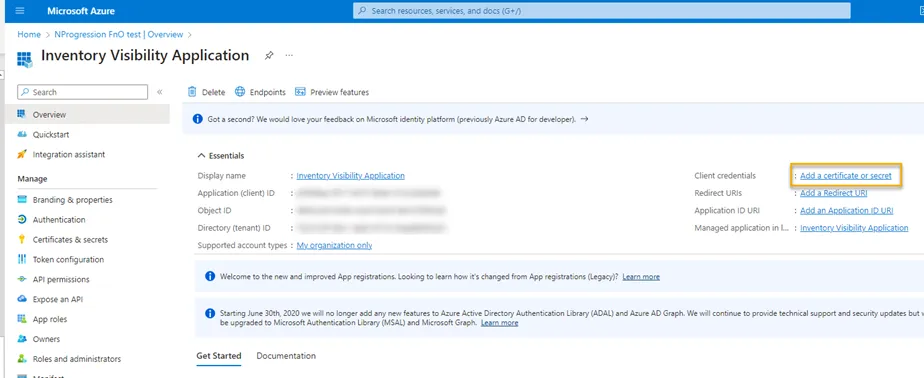
- When registration finishes, the Azure portal displays the app registration's Overview pane. Click Add a certificate or secret, to create a Secret Id for the application.
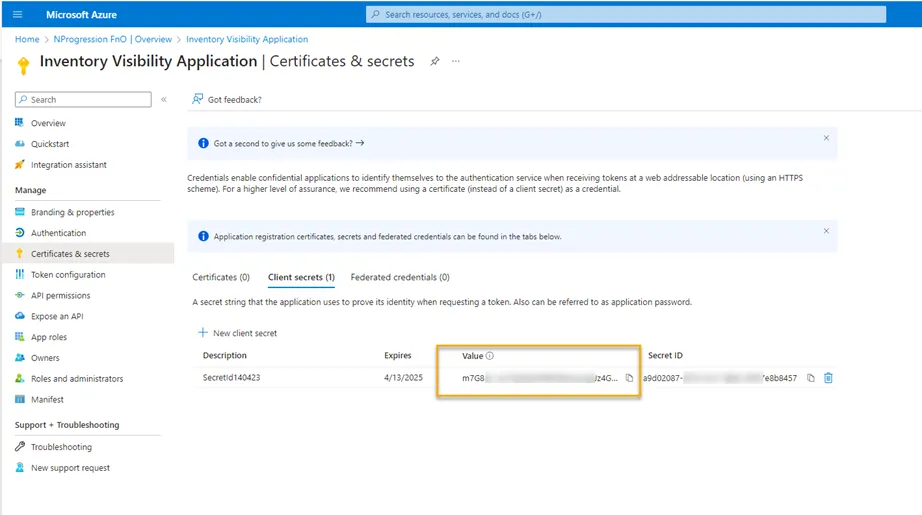
- On the Certificate & secrets page click on the [New client secret] button, and choose the Description and the Expires period for the Secret Id. Then click [Add].
- Make a note of Sercret Id Value, and go back to the application overview page.
- On the overview page make a note of Application (client) Id and Directory (tenant) ID. It will be necessary during Inventory Visibility Add-in installation later.

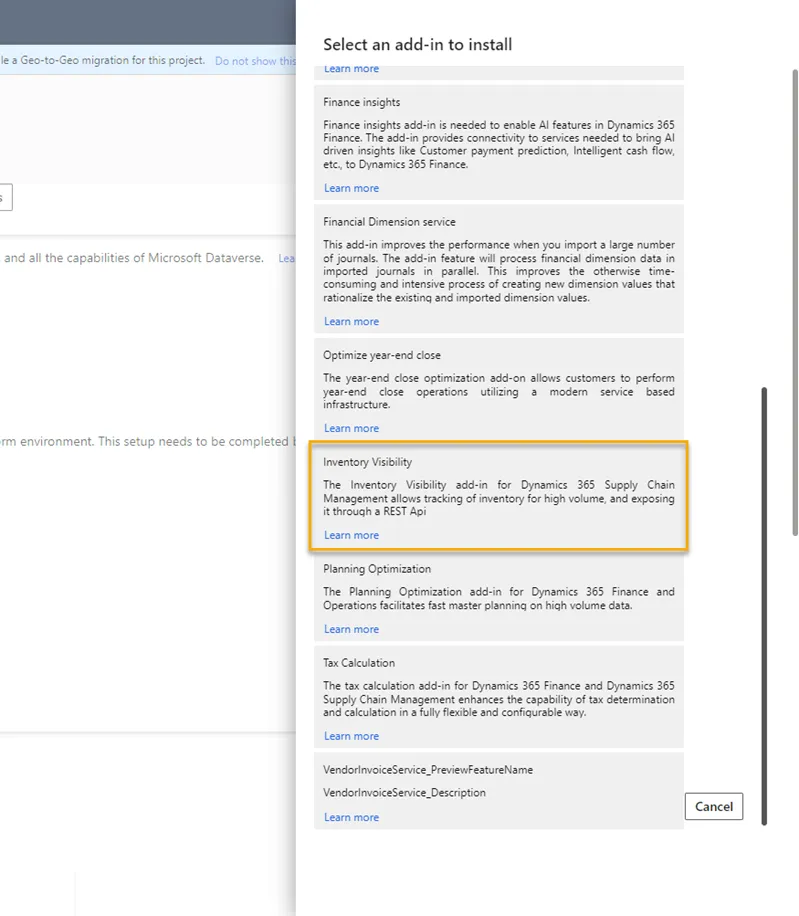
2. After you register an application and add a client secret to Azure AD, follow these steps to install the Inventory Visibility Add-in.
- Sign in to Lifecycle Services (https://lcs.dynamics.com/)
- On the home page, select the project where your environment is deployed
- On the project page, select the environment where you want to install the add-in.
- On the environment page, scroll down until you find the Environment add-ins section in the Power Platform integration section. There, you can find the Dataverse environment name. Confirm that the Dataverse environment name is the one that you want to use for Inventory Visibility.
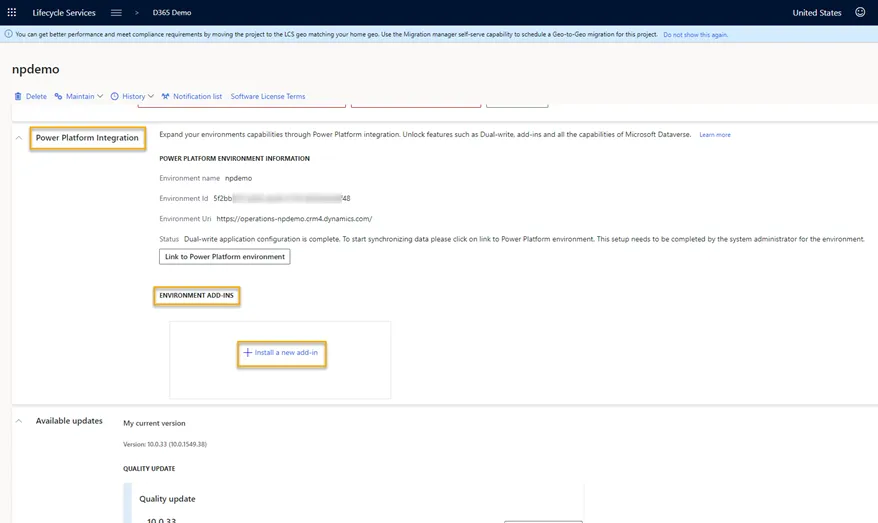
- In the Environment add-ins section, select Install a new add-in.
- In the list, select Inventory Visibility
- Set the following fields for your environment:
AAD application (client) ID – Enter the Azure AD application ID that you created and made a note of earlier.
AAD tenant ID – Enter the tenant ID that you made a note of earlier.
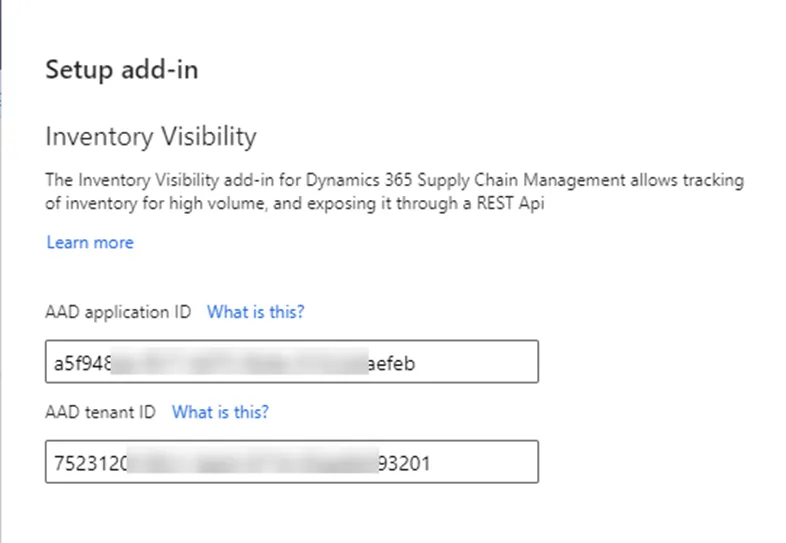
- Agree to the terms and conditions by selecting the Terms and conditions checkbox.
- Select Install. The status of the add-in is shown as Installing. When the installation is completed, refresh the page. The status should change to Installed.

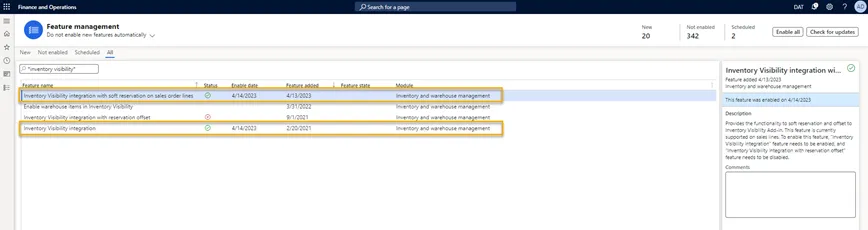
3. When the Inventory Visibility Add-in is installed successfully, we have to set up Inventory Visibility in Supply Chain Management.
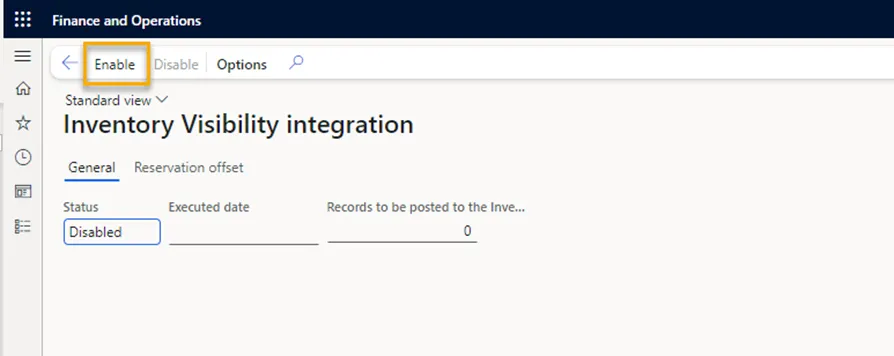
- In Supply Chain Management, open the Feature management workspace, and turn on the Inventory Visibility Integration feature and Inventory Visibility integration with soft reservation on sales order lines feature.
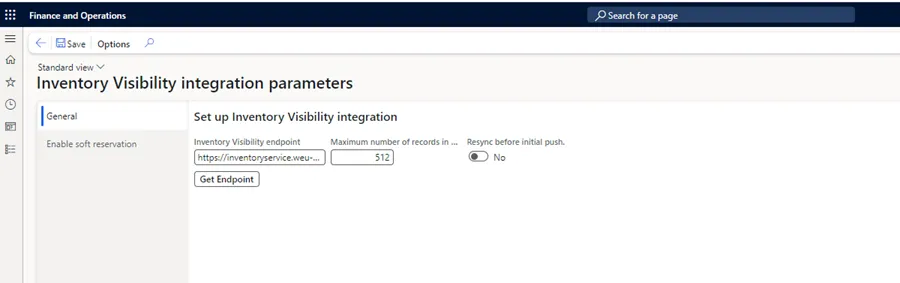
- Go to Inventory Management > Set up > Inventory Visibility Integration parameters.
- Open the General tab and make the following settings:
Inventory Visibility endpoint – Enter the URL of the environment where you're running Inventory Visibility or click the Endpoint button to set it up automatically.
Maximum number of records in a single request – Set to the maximum number of records to include in a single request. You must enter a positive integer less than or equal to 1000. The default value is 512. We strongly recommend keeping the default value unless you have received advice from Microsoft Support or are otherwise certain that you need to change it.
- On the same page go to the Enable soft reservation tab and choose the default soft reservation level from to usual options:
Block – this option will block the opportunity to make a physical reservation in sales orders without a soft reservation
Warning – this option will allow making a physical reservation in sales orders without soft reservation, however, the system will provide the information message.
Ignore – this option will allow making a physical reservation in sales orders without soft reservation.
I remarkably recommended choosing the Block option as a default soft reserve block level. It will ensure that you won’t have a underdeliver and double-booking.

- Go to Inventory Management > Periodic > Inventory Visibility Integration, and enable the job. All inventory change events from Supply Chain Management will now be posted to Inventory Visibility.
4. The last step is to configure the Inventory Visibility application.
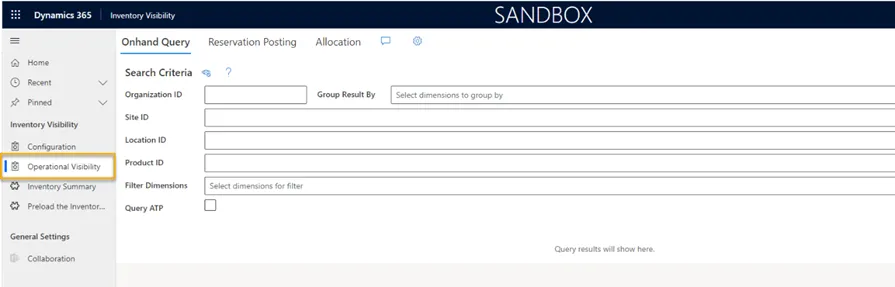
- Sign in to your Power Apps environment.
- Open the Inventory Visibility app.
- Open the Operational Visibility page from the left pane.
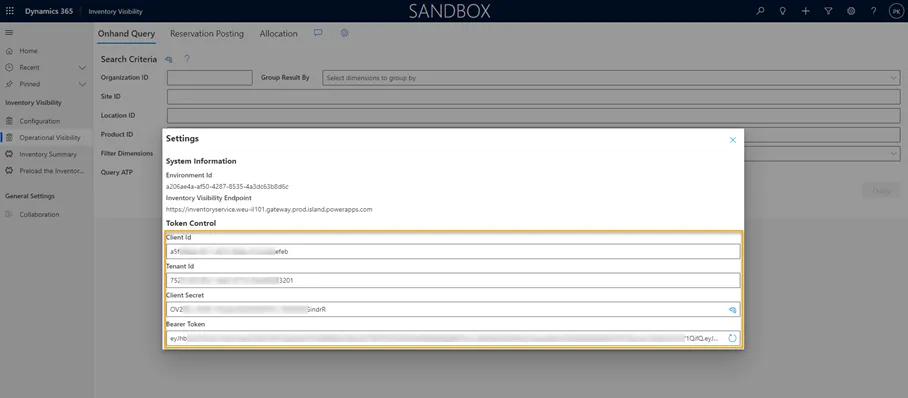
- Select the Settings button (gear symbol) at the top of the page
- In the Settings dialog box, enter the Client Id, Tenant Id, and Client Secret values that you noted during the first step. Select the Refresh button next to the Bearer Token field. The system generates a new bearer token, based on the information that you've entered.
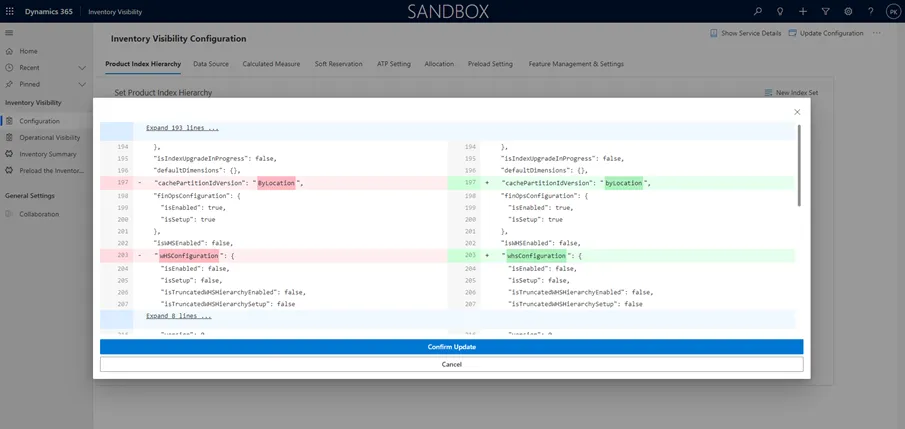
- After Inventory Visibility settings are configured go to Configuration menu and select Feature Management & Settings. On this menu turn on the following Features: FinOps, OnHandReservation and OnhandMostSpecificBackgroundService. Also, set the frequency of OnhandMostSpecificBackgroundService to 5 minutes, it is the minimum value you can use.

- After this is done, click the Update Configuration button on the top-right corner and confirm the update.
It was the last step in installing and configuring the Inventory Visibility functionality. It is ready to work! Thank you for your attention to my article, hope it helps you. As usual, if you have any questions or comments, do not hesitate to contact with me. I would be delighted to help you.
My next article will be dedicated to the example of using Inventory Visibility with soft reservation. I will provide settings to make soft reserves via API and from the Dynamics 365 SCM application. See you!
.webp)


